For every good do-it-yourself project I share with you, there is at least one untold disaster.
I'm a Mom, not a renovator/artist. I have three kids (one that is 2, so that raises the total even more). I have a limited budget and I'm messy.
So, disaster, is but a paint spill away.
I don't want you guys to think that my weekly projects always go as planned. Because they don't. I just don't usually talk about the laminate bookshelf I spray painted three different times because the paint wouldn't adhere to the laminate.

But it did adhere to my skin. For 3 days. I was blue, just like a Smurf.
Or remember my fancy pantry door? What I didn't tell you is that I spray painted the door inside my garage. My hubby rigged up something so it could hang and I could get even coats. What I wasn't counting on was the paint grabbing onto every dust particle in the air and covering everything in the garage with a fine red dust. It took weeks to clean it up.
Another example is the wall in my toddler's room. I found a can of Magnetic Spray Paint on the clearance aisle at WalMart. This stuff is not cheap, except I found it for just a couple of dollars. My big idea: paint part of a wall and let my daughter use it to hold magnets.
Brilliant, right?
Um, no. Because it was spray paint. But I didn't want to waste money, so I did it anyway. She couldn't sleep in her room for two days due to fumes. The overspray was horrible and the bonus? It wasn't magnetic (I would have been much better off with the roll on magnetic paint). Of course, I didn't learn this until after I painted the yellow Latex room paint over the gray magnetic paint.
A disaster.
But rather than give up, I decided to be creative and flexible. Here's how I fixed it:
Rather than buy roll-on magnetic paint that runs about $20, I found two magnetic dry erase boards for less than $20 for both. I adhered those over the non-magnetic mess I'd created. I used some bright pink paint to create a border to cover up the overspray.

The magnetic boards didn't cover the entire area, so I used some leftover rub-on alphabet letters.
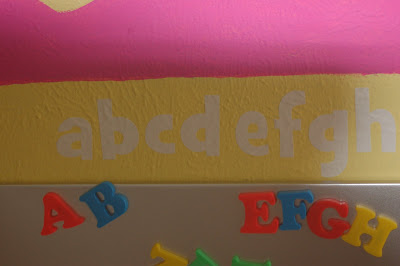
Not exactly what I had planned, but still good, and most importantly, useful.
When your DIY turns DISASTER:
- Don't panic.
- Rethink your plan and lay out all your options.
- Google-this is a great resource for stain removal ideas.
- Don't be afraid to ask for help,
- Buy used items to redo from garage/thrift sales so if it does get ruined, you haven't invested a lot.
- Learn from your mistakes.
- Give yourself a break. Most DIY-selfer's are trying to save money. It takes a lot of courage to paint your kitchen cabinets or rip out carpet. So, don't be too hard on yourself. Not everything always goes according to plan.
- Be realistic. If you expect perfection on every project, you will be disappointed.
Go ahead, share one of your DIY disasters. There's comfort in numbers.

19 comments:
I love that you admit you are messy - i thought I was the only one!! I am always spilling, overspraying and redoing my mistakes but it sure is fun and isnt it worth it to be able to say - I did that!!!! only when it is a compliment though!!!
Thank you for your post! I ripped up a portion (yes only a little bit) of the carpet in my playroom and put down self adhesive 12 x 12 tiles. ya...not such a great idea. The line where the carpet and tiles meet is totally lame and the tiles constantly lift in the corners. I have been embarrassed by my DIY project. So thanks for making me feel better!:)
Kudos and thank you for making me feel less alone. I have done so many projects that sounded so good at first only for the wheels to fall off in the execution.
One project comes to mind right off. The bookcase/nightstand in my bedroom. I thought that 1. I could cheat and not sand it and 2. that the craft paint in those little 2 ounce bottles would be just fine....NOT! I still need to fix it.
Did I mention that I ran out of black and did the inside of the shelves in red....only I ran out of one color red, so the shelves are actually two different red colors!
I think I have done all of the above, but never with the great attitude you have! I usually pronounce the thing ruined and stomp off.
Looking good!
I have none to report because I haven't done much myself! But when I do, I'll be sure to share!
Typically I am covered in paint...spray paint, craft paint, whatever. It never fails, my hands and nails are some unnatural color for days. Luckily, my projects are usually okay. I try not to go beyond what I know I am capable of.
Now if you wanted to talk recipes that went awry, well, that's a different story!
I did use the roll-on magnetic paint and it still did not work for me. 2 coats on 1 wall, it is thick and goopy and I spilled it while stirring it on a small part of the carpet, now behind the wall unit of course. The problem was that I needed 3 coats of regular paint to cover the black which took away the strength of the magnet. There is one spot on the whole wall that works.
I still look at one of my disasters. It's an easy fix but so time consuming. Decided to touch up all of my white paint on the walls and trim. Didn't count on the fact that the white had turned a bit beige from being in our attic, and didn't think that I was actually seeing beige at 10pm. So i spent 3 hours touching up and came down in the morning when it had "dried" and you could see every single spot that I had painted. It now just looks like I have dirty hand prints everywhere (which I do...so it just increases the bedlam look). I will fix it...soon. When the kids decide to wash their hands before they touch the walls ever again.
if you ever try to paint laminate again... put a coat of oil based primer on it. It prepares the surface for paint. We have hideous laminate cabinets in our kitchen and we can't really afford to remodel right now. So I primed them with the oil based primer and painted over them with a white satin paint and they looked as good as new..... until the kids started touching them (maybe I shouldn't have used white)!!!
I know she is enjoying those, and I usually yell for my husband when I create such disasters. He is very good at helping me get out of a mess. Jackie
Thanks for your honesty. I must admit I usually have more screw ups than success.
I love that bright pink border!
We can a can of that roll-on paint in our garage. I've been hanging onto it for 3 years, too afraid to use it. Now I'm REALLY afraid! :)
thank u from me also, it's nice to know that there are others out there whose projects don't always go according to plan.
if i had a dime for everytime i messed up... well, let's just say i could pay a professional to do it right the first time :)
Recently I decided to paint the walls of our screened porch. My husband came out to help with the parts I couldn't reach and pointed out that I was using my indoor paint instead of the outdoor. Ooops. It looks good though! Now for how long, who knows?
It wasn't exactly a disaster, but it was almost worth crying over...
I had decided to make a duvet cover for our bed. I found this awesome fabric HALF OFF at JoAnn's. It is beautiful (you can see pics of it on my blog if you want to) but VERY NOISY..not exactly something you want to sleep under. I had no idea what I was going to do. So I let it sit in my linen closet for about a month and half, where it taunted me. Then I decided to make curtains out of it! They look awesome and expensive and are exactly what I have been wanting for our bedroom :)
That's ok, we all have days like that. As long as you don't do the same thing twice. Have a great weekend.
I got the good deal on magnetic paint too, only mine the kind that rolls on. HORRIBLE! Like paint mixed with sand! Like the bottom of a pool? Every time I brushed my hand against it I got scraped knuckles! So....I covered it up with metal just like yours. Now we need to get the house ready to sell, and hubby wants to remove the metal, but we can't because it's hiding the paint!!!
My husband is a computer programmer so for his home office artwork, I tried to paint some circuitry on a canvas. The first step, covering the canvas in a gorgeous blue went well. But I learned it's really hard to make perfect squares and lines with black paint and a paint brush.
Ahhh, magnetic paint. I used the roll-on stuff, and it took an extra can or two then expected. Over that is chalk paint.
I use it to write on the kid's school schedules and hang up the school calenders.
In the middle of the project I was second guessing myself. Since then we have appreciated it, though I would complete it differently. But, like I said it took several cans of magnetic paint, plus chalk paint. We will be enjoying it for a very long time.
Post a Comment